Hosting a Static Site on S3 & Cloudfront
Considering this site is built with a static site generator, I needed to find somewhere to host it. Amazon’s S3 service, as it turns out, actually has an option to host a website out of it, which is ridiculously convenient for those who are comfortable using AWS services. Prior to this, I had purchased my domain through Namecheap.
Requirements
S3 + Cloudfront met all of my pretty simple set of requirements that I wanted to enforce:
- HTTPS - Site has to be secured with a valid certificate.
- Custom Domain - For professionalism and consistency.
- Easy Deployment - Should be able to push files easily, or have a CI/CD tool listen to my git repo to push things up.
Hosting in S3 seemed to be a very straightforward way of achieving these things, so I decided to go with it.
Note: If you use Terraform, the cloudposse module for ‘terraform-aws-cloudfront-s3-cdn’ will do all of this for you and then some. If you don’t, read on.
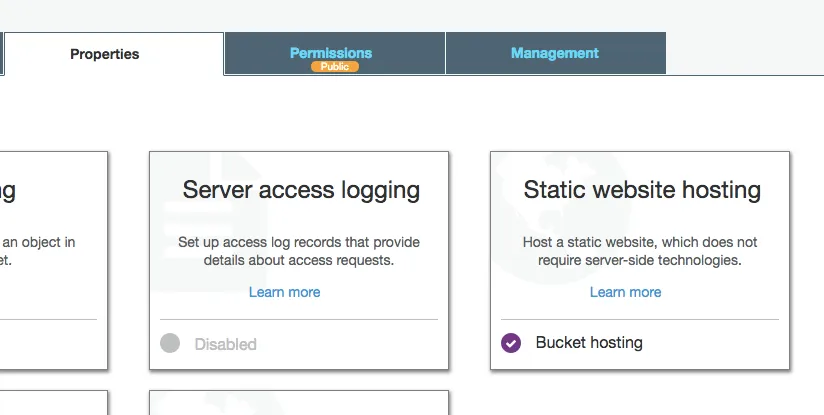
Setting Up S3 for Static Web Hosting
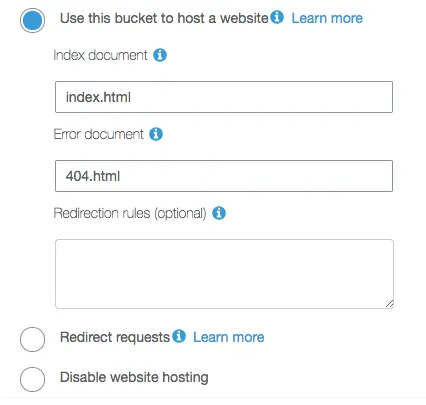
Setting up S3 for hosting a static site is as simple as checking a box. First create a bucket for your site.
On that menu, select your default landing document (something along the lines of index.html) and error document (i.e. 404.html or something like that).
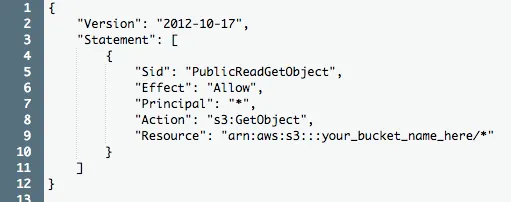
Setting Bucket Permissions
Once you’ve created your static site bucket and configured it for hosting, you need to set permissions on the bucket to allow GET requests.
Under the permissions tab, edit your permissions to allow s3:GetObject permissions to public.
Don’t Need HTTPS? You’re Done!
At this point, if you’re not interested in setting up your site to work with HTTPS, then you can call it quits at this point. S3 will provide you with a public URL that you can reach to see the site now:
http://<your_bucket_name_here>.s3-website-<region>.amazonaws.com/
You can point your domain at this URL and boom, you’re done.
Creating a Cloudfront Distribution
If you do want HTTPS, and you should want HTTPS, on your site, you’ll need to create a Cloudfront distribution, Amazon’s CDN, in order to provide secure connections.
Create a new web distribution, with the following options selected:
- Origin Domain Name - Amazon will automatically populate your S3 bucket in the dropdown, but you should use the full S3 website URL:
<your_bucket_name_here>.s3-website-<region>.amazonaws.com - Viewer Protocol Policy - Choose what you want to support, but I chose ‘Redirect HTTP to HTTPS’ here.
- Alternate Domain Names (CNAMEs) - This is how you’ll link your domain to the Cloudfront distribution, so you should put your domain in here.
- Default Root Object - This should be the same as the landing document you specified in your S3 bucket website option (i.e.
index.html). - Price Class - One noted option if you want to save on hosting costs is to select the US/Canada/Europe only price class.
- Custom SSL Certificate - By default, the distribution uses the Cloudfront certificate, but you should request your own if you’re hosting on a custom domain. Which brings us to our next section…
Request an SSL Certificate
In order to secure your site with HTTPS, you can request a certificate through AWS Certificate Manager for your domain. You’ll have to be able to prove you own the domain either through DNS validation or by email validation. I used email validation.
There’s a number of email addresses that AWS will send out a confirmation email to, listed here. Your domain provider should have options for forwarding email if you don’t have it set up through them.
Once you’re done with the certificate business, you can submit that Cloudfront distribution, which will take some time to set up.
Registering Your Cloudfront Distribution with Your Domain Provider
Once your cloudfront distribution is set up, you should now have a URL you can access with your site like this:
a983qewr90asf.cloudfront.net
Once you’ve got that URL, all you need to do is set up CNAME records in your domain provider, which will allow your domain to redirect to the Cloudfront distribution. For my site, I wanted to set it up using the bare domain, i.e. zmsy.co instead of www.zmsy.co.
I set up a CNAME record and a URL redirect in this way:
| Type | Host | Value |
|---|---|---|
| CNAME | @ | a983qewr90asf.cloudfront.net |
| URL Redirect | @ | https://a983qewr90asf.cloudfront.net |
That’s a Wrap!
You’ll be up and running once your domain is redirecting correctly. Now, once you push objects up to S3, they should populate out to the Cloudfront distribution automatically (albeit sometimes at a random schedule, since it’s a CDN that operates on its own time). Plenty of toolkits have S3 as a built-in endpoint, so setting up deployment either through a CLI or from a CI/CD server is relatively straightforward.
At the time I wrote this, Github Pages wasn’t offering HTTPS but have just announced support, and was primarily built using Jekyll. I’ll be checking that one out soon too.