Discovering PICO-8
The PICO-8 is a ‘fantasy console’, which is basically a virtual machine for programming videogames with a set amount of memory, disk space, screen size, etc. I discovered it after I recently played the excellent Celeste for Nintendo Switch and learning that it started life as a PICO-8 game. This thing looks damn fun to program for, and it comes batteries-included for most tasks so you can get up and running in no time.
Highlights
- Lua scripting.
- 16-color palette.
- 128 x 128 pixel screen size.
- 32k cartridge sizes.
- 4-channel sound.
On top of all that, the VM that runs the PICO-8 cartridge has been ported to hardware! It’s being included in all $9 C.H.I.P. computers by default now, so you can actually get a hardware implementation of the PICO-8 fantasy console for use in your own home.
People make some suuuuuuuuuuper cool stuff with it.
This is easily the most fun I’ve had working on a project! If you like what you see, give it a shot, and let me know what you think! Not nearly finished yet, but it already feels so good! #acceler8 #pico8 #indiedev #gamedev https://t.co/dWOhl3zRfW pic.twitter.com/aAjSnCcqjC
— Master of None (@Alturos) May 1, 2018
“Remember: this is a sneaking mission…” #mono8
#screenshotsaturday
#pico8#indiegames#indiedev#gamedev#guerrillawars#monogame#metalgearpic.twitter.com/NFWUkgK3uC— Matt Hughson (@matthughson) April 26, 2018
Let’s Give It a Shot
Starting out, I checked out this instructional youtube playlist by TeamworkCast. It helped me get an idea of what I wanted to create with PICO-8 (alongside being super entertaining). So now I was in a place where I had to figure out:
- Game programming patterns. How do people make games, well,
- Designing movement and obstacles.
- Sounds & sound editing.
Super easy, right? Well, no. Turns out people spend their entire lives getting good at these things. I’ve been doing a lot of research into how to get better at it though.
Resources Used
The things that helped me learn PICO-8, by subject area:
- PICO-8 API by Neko250. A neat little reference for helping figure out the calls you can make from PICO-8 itself.
- /r/pico8 subreddit - An exceedingly helpful community of people who are both PICO-8 game designers and enthusiasts.
- PICO-8 Cheat Sheet - A quick reference made by the users of /r/pico8.
- Lua for Programmers Cheat Sheet - Admittedly, grasping with the overwhelming simplicity of Lua was a little frustrating at first, but having a slew of examples helped.
- Awesome PICO-8 - One of the curated awesome lists that are found on github. This one in particular has a lot of good resources for starting up.
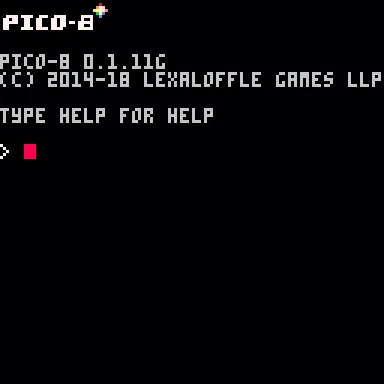
The PICO-8 Interface
The first place you’ll land is the command line in PICO-8, which is used to launch all of the other screens. It looks exactly like you’d expect it to.
There’s also a built-in IDE for developing games! This is where you can write your lua code, edit sprites, create background tiles and more.
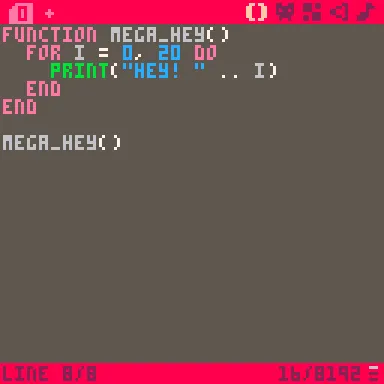
Multiple other pages in the editor exist for purposes of creating assets for these two pages: A sprite editor, a tile editor, a SFX editor, and a music arrangement screen. Combining all of these, you can make pretty convincing graphics & sound pretty quickly.
Experimenting
Since I don’t have the depth of experience to be able to make a legitimate video game yet, I’m focusing on doing exceedingly simple stuff for the time being.
There are basically only three functions to know:
_update()- Update the game state. Change objects position, behavior, etc. to match the game state._draw()- Give directions for what to draw on screen._init()- Initialize game state (only if you need to).
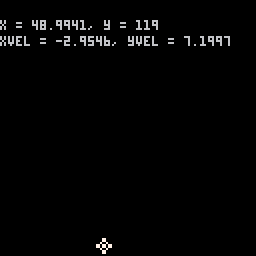
Using these, I ended up trying to do what most people try to do their first time using any 2D graphics program: make a ball bounce across the screen.
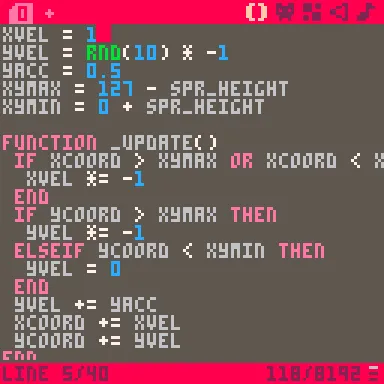
It works! But hey - this isn’t interactive, so we can’t quite call it a game yet. Here’s how we’ll do that.
- Add some listening for button presses using
btnp(). This determines whether or not a button was pressed that was not pressed during the prior frame. - Change the velocity based on that button. This time we’re adding a random positive velocity to the ball.
- Display some message or feedback so that I can tell I implemented it correctly.
Nice. But now, since this is a videogame we want to update a few more things:
- Run in 60FPS by using the
_update60()function instead of the update function. This makes our game run a lot smoother. - Add more natural slowdowns to the bounces. As the ball bounces off the floor, it should lose some of its velocity.
- Add some more x-axis movement. If the player hits the button, have it send the ball off in some random velocity along the x-axis.
What’s Next? (To be continued in Part 2)
Now that I’ve got the bones in place, I’m planning on creating a barebones clone of Flappy Bird for Part II of this blog post.
What’s the way to get there?
- Change the sprites to be objects. The ball itself should have an internal state that captures which sprite should be displayed at any point, and the collisions between it and everything else.
- Functional decomposition. It’s easy to write a lot of spaghetti code in pulling together simple demos; the way to scale this is to change the major parts to objects.
- Create wall-generation logic. Flappy Bird works on a randomly-generated basis, so I’ll need to create and manage a list of obstacles for the player to surpass.
Check it out on the next version of this post!